Posts

How to Push to a GitHub Repository in IntelliJ

Image
1. Initialize and Connect the Git Repository # Run in the terminal from the project root git init git remote add origin https://github.com/[user]/[repository].git 2. Configure Git in IntelliJ Select VCS → Enable Version Control Integration . Choose Git and click OK . 3. Connect Your GitHub Account Go to File → Settings (on Windows) or IntelliJ IDEA → Preferences (on macOS). Navigate to Version Control → GitHub . Click Add Account ( + ). Select Log In with Token... and enter your GitHub Personal Access Token. 4. Add and Commit Files Go to VCS → Git → Add (or use the shortcut Ctrl+Alt+A ). Select the files you want to commit. Go to VCS → Commit (or use the shortcut Ctrl+K ). Write a commit message and click Commit . 5. Push Go to VCS → Git → Push (or use the shortcut Ctrl+Shift+K ). Click the Push button. Simpler Method (Using IntelliJ's Built-in Feature) Go to VCS → Share Project on GitHub . Set the repository name to vita-user-...

How to extract YouTube to MP3 with yt-dlp

Image
yt-dlp.exe is a powerful command-line program that allows you to download videos and audio from various websites, including YouTube. With this tool, you can easily convert and save YouTube videos as MP3 audio files. Before you begin, yt-dlp.exe requires a separate program called FFmpeg to convert files to MP3 format. Therefore, you must complete the following two preparatory steps first. Prerequisites Download yt-dlp.exe: Go to the official yt-dlp GitHub releases page and download the latest version of the yt-dlp.exe file. Download and Install FFmpeg: Navigate to the official FFmpeg website and download the version compatible with your operating system (Windows). After unzipping the downloaded file, you must either copy the ffmpeg.exe file from the bin folder into the same folder as yt-dlp.exe , or add the path to the folder containing ffmpeg.exe to your system's Path environment variable. For ease of use, it is recommended to place yt-dlp.exe and ffmpe...

How to Add a gRPC Endpoint to a Spring Boot Microservice

Image
This blog guides you through the standard procedure for adding a gRPC endpoint to the order-service project. The primary goal is to handle "create new order" requests from external clients via gRPC. This process involves calling an internal u ser-service to validate user information. Why Use gRPC? Performance: It's fast, using HTTP/2 and binary serialization (Protobuf), which reduces communication overhead. Strict API Specification: The .proto file clearly defines the service interface and message structures, ensuring type safety at compile time. Multi-language Support: It's suitable for polyglot architectures, as clients and servers can be implemented in various languages. 1. Define the Service with Protocol Buffers (.proto) First, define the service contract by creating a .proto file in the src/main/proto directory. order.proto syntax = "proto3"; package com.abc.order.grpc; // Java code generation options option java_multiple_fil...

A Guide to Automating Connections with SecureCRT Logon Scripts

Image
Developers and system administrators often repeat the daily process of connecting to multiple servers via SSH or Telnet. SecureCRT's "Logon Actions" (or "Logon Scripts") feature is a useful tool that automates these repetitive connection procedures, reducing wasted time and significantly improving work efficiency. I personally used this feature because I found the process of connecting to a PostgreSQL database to be tedious every time. In addition to database connections, this feature is also very useful when you need to connect to a final destination server through an intermediary server, often for security reasons. For example, the true value of this feature becomes apparent in a "jump server" environment, where you must first log into Server A via SSH and then, from there, initiate another Telnet or SSH connection to Server B. Step 1: Create the Python Script File Create a python code file with a .py extension. It's recommended to creat...

How to install docmost on Synology NAS (DS916+) with Docker

Image
This blog provides a comprehensive guide to installing and configuring Docmost, an open-source collaborative wiki and notion alternative, on a Synology NAS (DS916+ and similar models) environment using Docker. 1. Reverse Proxy Setup for External Access To access Docmost via an external domain (e.g.,  docmost.your-domain.i234.me ) and to fix the "Real-time editor connection lost" error, a reverse proxy setup is essential. Step 1. Navigate to Reverse Proxy Settings Go to DSM  Control Panel  >  Login Portal  >  Advanced  tab. Click the  Reverse Proxy  button and then  Create . Step 2. General Settings Step 3. (Crucial) Custom Header Settings After clicking  Create , go to the  Custom Header  tab. Click the  Create  dropdown menu and select  WebSocket . This will automatically add the two necessary headers. This step is key to resolving the real-time editing error. Click  Save  to complete...

How to Fix Lombok's @Builder Ignoring Initial Values with @Builder.Default

Image
Lombok's @Builder is a powerful feature that replaces repetitive builder pattern code with a single annotation. However, when using @Builder , you might encounter the following warning message when you set an initial value for a field: java: @Builder will ignore the initializing expression entirely. If you want the initializing expression to serve as default, add @Builder.Default. If it is not supposed to be settable during building, make the field final. Why Does the Warning Occur? - How Lombok Works Before solving the problem, it's important to understand why Lombok ignores the initial value of the field. When a class is annotated with @Builder , Lombok generates a separate inner Builder class (e.g., UserBuilder ) at compile time. This is the class we use through the .builder() method. The key is that the fields of the original class and the fields of the Builder class exist in different spaces. import lombok.Builder; import lombok.Getter; @Getter @Builder pu...

From Audio Station to Plex Media Server, A Complete Guide for the Synology DS916+

Image
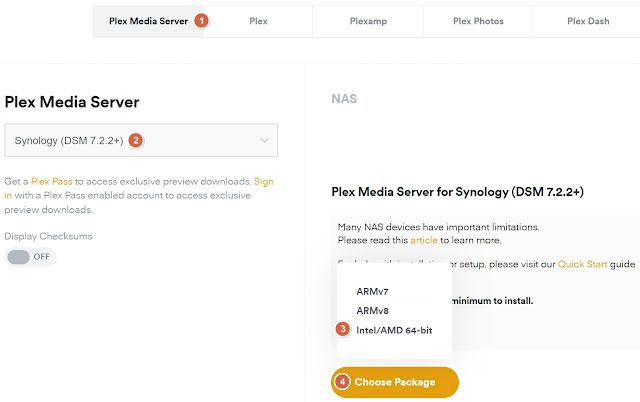
For nearly ten years, my Synology DS916+ has been a trusty workhorse for file storage. When it came to music, I relied on Synology's own Audio Station. But the experience was never quite right. The UI felt dated, and the constant need to re-enter my OTP password after it expired was a pretty annoyance. I'd heard great things about Plex, specifically that even the free version was a massive improvement. I decided it was time to make the switch. In this blog post, I'll walk you through the exact steps I took to install and configure Plex Media Server on my Synology DS916+. Step 1: Installing the Plex Media Server Package You have two main options for installing Plex. While using the Synology Package Center is simple, I strongly recommend downloading the package directly from the Plex website to ensure you have the latest features and bug fixes. Option 1: The Package Center (Easy, but may be outdated) You can find Plex in the Synology DSM Package Center under ...