Posts

Showing posts with the label linux

Changing the Default Terminal to Terminator on Ubuntu

Image
Terminator is a powerful tool for developers, allowing you to manage multiple terminal sessions in a single window. Features like splitting panes, tabs, and simultaneous input can significantly boost your productivity. Step 1: Install Terminator First, install Terminator using the apt package manager. sudo apt update sudo apt install terminator -y The -y option automatically answers 'yes' to any prompts during the installation process, streamlining the setup. Step 2: Set as the System Default Ubuntu uses a utility called update-alternatives to manage default applications. We'll use this tool to change the default terminal emulator ( x-terminal-emulator ) to Terminator. Run the Configuration Command Enter the following command in your terminal. A list of available terminals will appear. sudo update-alternatives --config x-terminal-emulator Select Terminator From the resulting list, enter the selection number corresponding to terminator and press Enter. ...

Setting Up a Modern Vim 9.x IDE on Ubuntu or Linux

Image
This guide walks you through the process of transforming the terminal on a new Ubuntu or Linux server into a powerful, IDE-like environment. We will accomplish this by installing the latest Vim 9.x, setting up a plugin manager, and configuring essential plugins for a modern development workflow. Step 1: Create Vim Directories First, let's create the directories where Vim's settings will be stored. These folders will hold backup files, swap files, and a persistent undo history, which helps keep your project folders clean and improves data safety. # Pre-create directories for Vim settings mkdir -p ~/.vim/undodir ~/.vim/backupdir ~/.vim/swapdir Step 2: Prepare the .vimrc File Next, create Vim's configuration file, ~/.vimrc . Copy the content below and paste it into your ~/.vimrc file. This configuration includes a list of plugins, key mappings, UI settings, and more. # Save the following content as your ~/.vimrc file. " === Plugin Manager: vim-plug === ...

How to get rid of ^M from a text file on Linux or Unix

Image
When you transfer text files from Windows to Linux or Unix systems, you often see ' ^M' characters at the end of lines. This happens because Windows and Linux/Unix handle line breaks differently—Windows uses CR+LF ( \r\n ) , while Linux/Unix just uses LF ( \n ) . In this guide, we’ll look at a few simple ways to remove these characters and explain how each method works. $ cat -v HelloWorld.java public class HelloWorld^M {^M public static void main(String[] args) {^M System.out.println("Hello World!");^M }^M }^M Using the dos2unix command The dos2unix command is a simple and widely used method. $ dos2unix filename Using vi/vim editor In Vi/Vim, You can directly search for and remove the ' ^M' character. The command above searches for ' ^M' at the end of each line throughout the entire file and removes it. To input '^M', push Ctrl down and then press v and n consecutively. Vim on Linux: 'Ctrl + v + m' Gvim ...

How to Find and Kill a Process Using a Specific Port on Linux (lsof & netstat)

Introduction When executing a process, it may fail to start if the port it needs is already occupied by another process. In such cases, you need to find out which process is using that port and either terminate it or modify its configuration. Using lsof lsof (List Open Files) is a command in Linux-like systems that displays a list of all open files and the processes that opened them. Option explanation: -i : Display the listing of files whose Internet address matches the specified address or protocol. Example: Check if port 22 is in use lsof -i TCP:22 Output: COMMAND PID USER FD TYPE DEVICE SIZE/OFF NODE NAME sshd 1116 root 5u IPv4 33907 0t0 TCP *:ssh (LISTEN) sshd 1116 root 7u IPv6 33909 0t0 TCP *:ssh (LISTEN) Using netstat netstat is a utility that prints network connections, routing tables, interface statistics, masquerade connections, and multicast memberships. Common options: -l : Display listening sockets -n : Displa...

SecureCRT] How to Set Up a Serial Console Connection

Image
The below setting values are used for HP DL380, DL580 (Red Hat Linux) or HP server (HP-UX) .  Setting Value Description Port COM3 The serial port number on your laptop. COM3 is an example — use the actual COM port assigned to your serial-to-USB adapter or internal port. Baud rate 9600 The speed of communication in bits per second (bps). 9600 is the default baud rate for most servers. Data bits 8 Number of data bits per character. 8 bits is standard for ASCII data transmission. Parity None Parity is used for error checking. "None" means no parity bit is used — common and standard for most connections. Stop bits 1 Number of bits used to signal the end of a data packet. 1 stop bit is the most common setting. Flow control XON/XOFF Software...

Disable Wi-Fi Power Saving on Ubuntu for fast access to SSH, Telnet, and FTP

Image
If you've noticed that SSH connections become very slow or unresponsive after your Ubuntu laptop has been idle for a while. This often happens because your Wi-Fi card enters power-saving mode, reducing network activity until it's manually "woken up." Here's how to check and disable Wi-Fi power management to ensure fast access to services like SSH, Telnet, and FTP. Step 1: Identify Your Network Interface Run the following command to find your WiFi network interface: $ iw dev phy#0 Interface wlp3s0 ifindex 3 wdev 0x1 addr d4:d2:52:96:ff:6e ssid ABCD1234 Here, wlp3s0 is your Wi-Fi interface name. You'll use this in the following steps. Step 2: Check Power Management Status Use iwconfig to check if power saving is enabled: $ iwconfig wlp3s0 wlp3s0 IEEE 802.11 ESSID:"ABCD1234" Mode:Managed Frequency:5.26 GHz Access Point: 38:06:E6:28:76:75 Tx-Power=22 dB...

How to Set a Static IP Address for WiFi on Ubuntu 22.04 using Netplan

When I use WiFi on my test laptop, its IP address sometimes changes. Because of this, I have to update the IP address on other client devices or change the settings of the application running on the test laptop. It would be easier to set a fixed IP address for the test laptop directly on the router, but I can't do that because of security policies. So, I decided to set a static IP address on the test laptop itself. Check Ubuntu version $ lsb_release -a No LSB modules are available. Distributor ID: Ubuntu Description: Ubuntu 22.04.4 LTS Release: 22.04 Codename: jammy 1. Check Your WiFi Interface Name $ ip address | grep 192 inet 192.168.1.95/24 brd 192.168.1.255 scope global wlp3s0 2. Locate the Netplan Configuration File $ cd /etc/netplan /etc/netplan$ ls 01-network-manager-all.yaml 3. Back Up the Original File $ sudo cp 01-network-manager-all.yaml 01-network-manager-all.org 4. Edit the Netplan YAML File $ sudo vim 01-network-manager-all.yaml ...

Setting Up Vim with vim-plug on Ubuntu

This walkthrough will guide you through setting up Vim with vim-plug, a minimalist Vim plugin manager, on your Ubuntu system. This setup will enhance your Vim experience with useful plugins and configurations. Step 1:  Create Necessary Directories First, we'll create the necessary directories for backups, swap files, and undo history.   $ mkdir -p ~/.vim/backup ~/.vim/swap ~/.vim/undo Step 2: Install vim-plug download the plug.vim script from the vim-plug GitHub repository and save it to the ~/.vim/autoload/ directory.   $ curl -fLo ~/.vim/autoload/plug.vim --create-dirs \     https://raw.githubusercontent.com/junegunn/vim-plug/master/plug.vim Step 3: Configure .vimrc Copy the following settings into the ~/.vimrc file in your Linux (Ubuntu) user account   " Basic settings     set hlsearch " Highlight search results   set nu " Show line numbers   set autoindent " Enable automatic indentation   set scrolloff = 2   set ...

How to Resolve ACPI Errors When Installing Ubuntu 22.04 on ASUS GA502GU-PB73

Image
Introduction: While attempting to install Ubuntu 22.04 on ASUS GA502GU-PB73, the installation process halts with ACPI BIOS errors, specifically "ACPI BIOS Error (bug): Could not resolve symbol". This indicates a potential incompatibility with certain hardware components or incorrect BIOS/UEFI settings. ASUS does not officially support Linux distributions like Ubuntu, so the exact cause of issues cannot be clearly identified. However, it's possible that some hardware components in this laptop may not be fully compatible with certain Linux distributions or kernel versions. Additionally, problems related to ACPI (Advanced Configuration and Power Interface) can occur if the BIOS or UEFI settings are not configured correctly. [ 4.689445] amdgpu 0000:05:00.0: amdgpu: ring comp_1.3.0 uses VM inv eng 8 on hub 0 [ 4.689454] amdgpu 0000:05:00.0: amdgpu: ring comp_1.0.1 uses VM inv eng 9 on hub 0 [ 4.689463] amdgpu 0000:05:00.0: amdgpu: ring comp_1.1.1 uses VM inv eng 10 on hub...

Keeping Your Ubuntu 22.04 Laptop Powered On with the Lid Closed

If you're using a laptop with Ubuntu 22.04 and you want to keep it running even when the lid is closed, you'll need to modify a system configuration file. This is particularly useful if you're running long processes or using the laptop as a server. Here's a step-by-step guide on how to do it. Step 1: Modify the logind.conf File You'll need to edit the /etc/systemd/logind.conf file with superuser privileges. This file controls how the system responds to various events, including the lid being closed. Here's how to modify it: sudo vi /etc/systemd/logind.conf In the logind.conf file, find the line that says #HandleLidSwitch=suspend . Change it to HandleLidSwitch=ignore . This tells the system to ignore the lid being closed and keep running. [Login] #NAutoVTs=6 #ReserveVT=6 ... HandleLidSwitch=ignore ... Step 2: Apply the Changes After saving the file, you need to apply the changes. You can either reboot your laptop or restart the systemd-logind.service. To restart ...

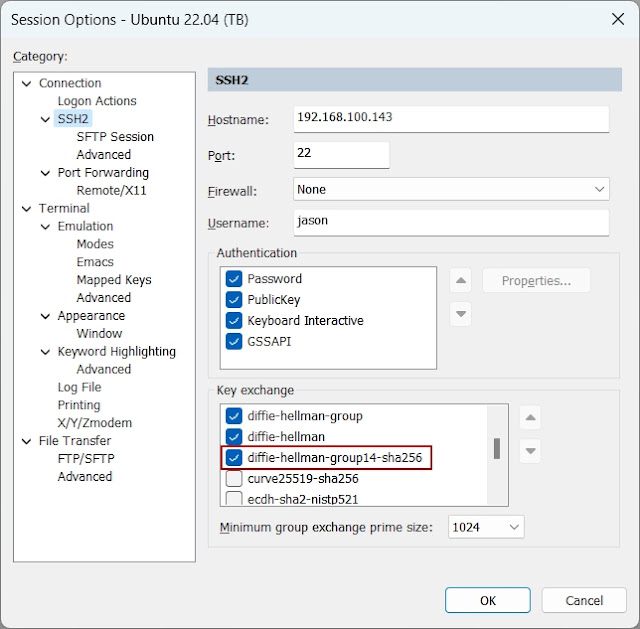
Resolving Key Exchange Failure When Connecting with SecureCRT to OpenSSH

Image
Recently, after installing OpenSSH on my Ubuntu 22.04 laptop, I encountered a challenge while trying to establish a connection using SecureCRT. An error message appeared: Key exchange failed. No compatible key-exchange method. The server supports these methods:   curve25519-sha256,curve25519-sha256@libssh.org,ecdh-sha2-nistp256,ecdh-sha2-nistp384,ecdh-sha2-nistp521,sntrup761x25519-sha512@openssh.com,diffie-hellman-group-exchange-sha256,diffie-hellman-group16-sha512,diffie-hellman-group18-sha512,diffie-hellman-group14-sha256,kex-strict-s-v00@openssh.com The following key-exchange method(s) are supported but not currently allowed  for this session:   curve25519-sha256,curve25519-sha256@libssh.org,ecdh-sha2-nistp256,ecdh-sha2-nistp384,ecdh-sha2-nistp521,sntrup761x25519-sha512@openssh.com,diffie-hellman-group-exchange-sha256,diffie-hellman-group16-sha512,diffie-hellman-group18-sha512,diffie-hellman-group14-sha256,kex-strict-s-v00@openssh.com,curve25519-sha256 Key-exchange m...

How to change Hostname on Amazon Linux Permanently

On Amazon Linux, the process to change the hostname is similar to other Linux distributions. Below are the steps to change the hostname and ensure it remains after a reboot. 1. Edit /etc/sysconfig/network file: /etc/sysconfig/network file is one of the files used to configure networking settings on a Linux system. The changed hostname serves as the network identifier for the system. sudo vi /etc/sysconfig/network NETWORKING=yes HOSTNAME=your_new_hostname 2. Edit /etc/hostname file: /etc/hostname file defines the system’s hostname and how the server identifies and reports itself on the network. By altering this file, the changed hostname will be applied when the system reboots next. echo "your_new_hostname" | sudo tee /etc/hostname 3. Edit /etc/hosts file: /etc/hosts file serves the role of mapping IP addresses to hostnames and is referred to before DNS queries are made. For instance, if the 127.0.0.1 address is not mapped to the system's hostname, some systems may be una...