Posts

Showing posts with the label vim

Changing the Default Terminal to Terminator on Ubuntu

Image
Terminator is a powerful tool for developers, allowing you to manage multiple terminal sessions in a single window. Features like splitting panes, tabs, and simultaneous input can significantly boost your productivity. Step 1: Install Terminator First, install Terminator using the apt package manager. sudo apt update sudo apt install terminator -y The -y option automatically answers 'yes' to any prompts during the installation process, streamlining the setup. Step 2: Set as the System Default Ubuntu uses a utility called update-alternatives to manage default applications. We'll use this tool to change the default terminal emulator ( x-terminal-emulator ) to Terminator. Run the Configuration Command Enter the following command in your terminal. A list of available terminals will appear. sudo update-alternatives --config x-terminal-emulator Select Terminator From the resulting list, enter the selection number corresponding to terminator and press Enter. ...

Setting Up a Modern Vim 9.x IDE on Ubuntu or Linux

Image
This guide walks you through the process of transforming the terminal on a new Ubuntu or Linux server into a powerful, IDE-like environment. We will accomplish this by installing the latest Vim 9.x, setting up a plugin manager, and configuring essential plugins for a modern development workflow. Step 1: Create Vim Directories First, let's create the directories where Vim's settings will be stored. These folders will hold backup files, swap files, and a persistent undo history, which helps keep your project folders clean and improves data safety. # Pre-create directories for Vim settings mkdir -p ~/.vim/undodir ~/.vim/backupdir ~/.vim/swapdir Step 2: Prepare the .vimrc File Next, create Vim's configuration file, ~/.vimrc . Copy the content below and paste it into your ~/.vimrc file. This configuration includes a list of plugins, key mappings, UI settings, and more. # Save the following content as your ~/.vimrc file. " === Plugin Manager: vim-plug === ...

How to get rid of ^M from a text file on Linux or Unix

Image
When you transfer text files from Windows to Linux or Unix systems, you often see ' ^M' characters at the end of lines. This happens because Windows and Linux/Unix handle line breaks differently—Windows uses CR+LF ( \r\n ) , while Linux/Unix just uses LF ( \n ) . In this guide, we’ll look at a few simple ways to remove these characters and explain how each method works. $ cat -v HelloWorld.java public class HelloWorld^M {^M public static void main(String[] args) {^M System.out.println("Hello World!");^M }^M }^M Using the dos2unix command The dos2unix command is a simple and widely used method. $ dos2unix filename Using vi/vim editor In Vi/Vim, You can directly search for and remove the ' ^M' character. The command above searches for ' ^M' at the end of each line throughout the entire file and removes it. To input '^M', push Ctrl down and then press v and n consecutively. Vim on Linux: 'Ctrl + v + m' Gvim ...

Use jq to Format JSON in gVim on Windows (Prettify & Minify)

Image
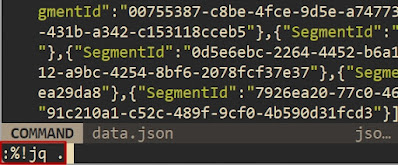
jq is a powerful command-line tool for processing and formatting JSON data. While there's no official Windows version available anymore, you can still use jq on Windows with an unofficial executable. Step 1: Download the jq Executable Visit the following GitHub release page and download the 64-bit version (jq-win64.exe): https://github.com/jqlang/jq/releases/tag/jq-1.6 Rename from jq-win64.exe to jq.exe and move it to your Vim folder like "C:\Program Files\Vim\vim91" Step 2: Add to System Path Open: Control Panel → System → Advanced system settings → Environment Variables Under “System Variables”, find and select Path, then click “Edit”. Add the following path: C:\Program Files\Vim\vim91 Step 3: Test jq in Terminal Open Command Prompt or PowerShell and run: PS C:\Users\jason> jq --version You should see: jq-1.6 Step 4: Use jq Inside Vim/GVim In Vim/GVim, format the current file using: :%!jq . This sends the whole file through jq and repla...

Setting Up Vim with vim-plug on Ubuntu

This walkthrough will guide you through setting up Vim with vim-plug, a minimalist Vim plugin manager, on your Ubuntu system. This setup will enhance your Vim experience with useful plugins and configurations. Step 1:  Create Necessary Directories First, we'll create the necessary directories for backups, swap files, and undo history.   $ mkdir -p ~/.vim/backup ~/.vim/swap ~/.vim/undo Step 2: Install vim-plug download the plug.vim script from the vim-plug GitHub repository and save it to the ~/.vim/autoload/ directory.   $ curl -fLo ~/.vim/autoload/plug.vim --create-dirs \     https://raw.githubusercontent.com/junegunn/vim-plug/master/plug.vim Step 3: Configure .vimrc Copy the following settings into the ~/.vimrc file in your Linux (Ubuntu) user account   " Basic settings     set hlsearch " Highlight search results   set nu " Show line numbers   set autoindent " Enable automatic indentation   set scrolloff = 2   set ...

Setting Up gVim (_vimrc) on Windows

Step 1: Install Vim First, make sure you have Vim installed on your Windows machine. Step 2: Install Pathogen Pathogen is a Vim plugin manager that simplifies the process of installing and managing plugins. To install Pathogen on Windows, follow these steps: PowerShell 7.4.2 PS C:\Users\jason> New-Item -ItemType Directory -Force -Path $HOME\vimfiles\autoload, $HOME\vimfiles\bundle Directory: C:\Users\jason\vimfiles Mode LastWriteTime Length Name ---- ------------- ------ ---- d---- 2024-06-02 9:47 PM autoload d---- 2024-06-02 9:47 PM bundle PS C:\Users\jason> Invoke-WebRequest -Uri https://tpo.pe/pathogen.vim -OutFile $HOME\vimfiles\autoload\pathogen.vim PS C:\Users\jason> cd $HOME\vimfiles\bundle PS C:\Users\jason\vimfiles\bundle> git clone https://github.com/flazz/vim-colorschemes.git Cloning into 'vim-colorschemes'... remote:...

Regular expression to change the first letter of each line to uppercase

Regular Expression When you execute this command, it will change the first letter of every line in the file to uppercase, leaving the rest of the line unchanged. :%s/^\(.\)/\U\1/g Break down and explain This regular expression command breaks down as follows: Regular expression Description :%s Substitute command to find and replace text in the entire file. ^ Anchors the search to the beginning of each line. \(.\) Captures the first character of each line in a group (denoted by \(.\)). \U\1 Replaces the captured first character with its uppercase version (\U) and the backreference to the captured group (\1). g This flag stands for “global”. When it appears at the end of the command, it means that all occurrences of the pattern in each line should be replaced.

Regular expression to remove HTML tags

Regular Expression When you use this regular expression ' [^>]* ' to find matches in a text, it will identify all HTML tags. To remove the HTML tags, you can replace the matches with an empty string, effectively eliminating the tags from the text. :%s/<[^>]*>//g Break down and explain This regular expression command breaks down as follows: Regular expression Description :%s Substitute command to find and replace text in the entire file. < This part matches the character < in the text. It looks for the beginning of an HTML tag. [^>]* The ^ symbol means "not" in this context. So, [^>] means "any character except >". The * symbol indicates "zero or more occurrences" of the previous pattern. Hence, [^>]* matches any number of characters that are not >. > This part matches the character > in the text. It looks for the end of an HTML tag. // This is the replacement empty string. g This 'g' signifies “global”...