Posts

Showing posts with the label SecureCRT

Changing the Default Terminal to Terminator on Ubuntu

Image
Terminator is a powerful tool for developers, allowing you to manage multiple terminal sessions in a single window. Features like splitting panes, tabs, and simultaneous input can significantly boost your productivity. Step 1: Install Terminator First, install Terminator using the apt package manager. sudo apt update sudo apt install terminator -y The -y option automatically answers 'yes' to any prompts during the installation process, streamlining the setup. Step 2: Set as the System Default Ubuntu uses a utility called update-alternatives to manage default applications. We'll use this tool to change the default terminal emulator ( x-terminal-emulator ) to Terminator. Run the Configuration Command Enter the following command in your terminal. A list of available terminals will appear. sudo update-alternatives --config x-terminal-emulator Select Terminator From the resulting list, enter the selection number corresponding to terminator and press Enter. ...

A Guide to Automating Connections with SecureCRT Logon Scripts

Image
Developers and system administrators often repeat the daily process of connecting to multiple servers via SSH or Telnet. SecureCRT's "Logon Actions" (or "Logon Scripts") feature is a useful tool that automates these repetitive connection procedures, reducing wasted time and significantly improving work efficiency. I personally used this feature because I found the process of connecting to a PostgreSQL database to be tedious every time. In addition to database connections, this feature is also very useful when you need to connect to a final destination server through an intermediary server, often for security reasons. For example, the true value of this feature becomes apparent in a "jump server" environment, where you must first log into Server A via SSH and then, from there, initiate another Telnet or SSH connection to Server B. Step 1: Create the Python Script File Create a python code file with a .py extension. It's recommended to creat...

Synology DS916+] How to Set Up SSH Key-Based Login from Windows 11 to Synology NAS (DSM 7.1)

Image
This step-by-step guide explains how to generate an SSH key on Windows 11 using Git Bash and configure key-based authentication on Synology NAS running DSM 7.1 . This lets you securely log in without typing a password every time. Although clients like SecureCRT offer features to remember your password after one login, setting up SSH key authentication is a more secure and reliable method—especially for automation, scripting, or accessing your NAS from multiple devices. Step 1: Enable User Home Service on DSM 7.1 Go to: Control Panel → User & Group → Advanced Enable User Home Service Step 2: Enable SSH Service on DSM 7.1 Navigate to: Control Panel → Terminal & SNMP → Terminal Enable SSH service Make sure Port 22 is allowed in your NAS firewall settings Step 3: Set Permissions for .ssh Directory C:\Users\jason>ssh -p 22 abc.i234.me jason@abc.i234.me's password: Synology strongly advises you not to run commands as the root user, who has the hi...

SecureCRT] How to Back Up and Restore SecureCRT Settings on Windows

Image
If you're a frequent user of SecureCRT , backing up your session settings and restoring them later is crucial—especially when migrating to a new PC or recovering from a crash. In this guide, you’ll learn how to manually back up and restore SecureCRT settings on Windows , ensuring you never lose your configurations again. Does SecureCRT Have a Built-in Export/Import Feature? Yes, SecureCRT provides built-in export and import features in the Tools menu. However, these features may not capture all configuration details such as: Backup scripts Custom login scripts Certain session-specific files Therefore, if you want to completely clone your SecureCRT environment—including every session and customization—the safest option is to manually back up the entire Config folder. What Is the SecureCRT Config Folder? SecureCRT stores your personal settings (sessions, host keys, global options, etc.) in a folder located at: C:\Users\<Your username>\AppData\Roaming\VanDyke\Config Th...

SecureCRT] How to Set Up a Serial Console Connection

Image
The below setting values are used for HP DL380, DL580 (Red Hat Linux) or HP server (HP-UX) .  Setting Value Description Port COM3 The serial port number on your laptop. COM3 is an example — use the actual COM port assigned to your serial-to-USB adapter or internal port. Baud rate 9600 The speed of communication in bits per second (bps). 9600 is the default baud rate for most servers. Data bits 8 Number of data bits per character. 8 bits is standard for ASCII data transmission. Parity None Parity is used for error checking. "None" means no parity bit is used — common and standard for most connections. Stop bits 1 Number of bits used to signal the end of a data packet. 1 stop bit is the most common setting. Flow control XON/XOFF Software...

Resolving Key Exchange Failure When Connecting with SecureCRT to OpenSSH

Image
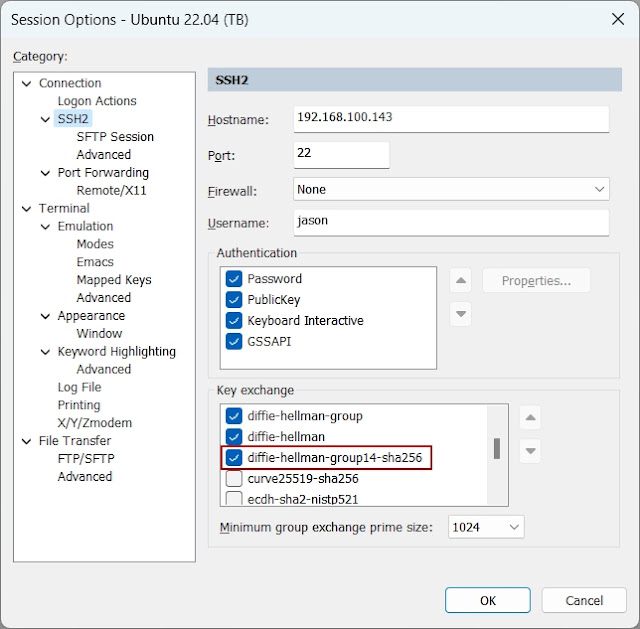
Recently, after installing OpenSSH on my Ubuntu 22.04 laptop, I encountered a challenge while trying to establish a connection using SecureCRT. An error message appeared: Key exchange failed. No compatible key-exchange method. The server supports these methods:   curve25519-sha256,curve25519-sha256@libssh.org,ecdh-sha2-nistp256,ecdh-sha2-nistp384,ecdh-sha2-nistp521,sntrup761x25519-sha512@openssh.com,diffie-hellman-group-exchange-sha256,diffie-hellman-group16-sha512,diffie-hellman-group18-sha512,diffie-hellman-group14-sha256,kex-strict-s-v00@openssh.com The following key-exchange method(s) are supported but not currently allowed  for this session:   curve25519-sha256,curve25519-sha256@libssh.org,ecdh-sha2-nistp256,ecdh-sha2-nistp384,ecdh-sha2-nistp521,sntrup761x25519-sha512@openssh.com,diffie-hellman-group-exchange-sha256,diffie-hellman-group16-sha512,diffie-hellman-group18-sha512,diffie-hellman-group14-sha256,kex-strict-s-v00@openssh.com,curve25519-sha256 Key-exchange m...