Posts

Showing posts from December, 2023

Managing FastAPI Projects with Poetry: A Step-by-Step Guide

Image
This guide will walk you through how to use Poetry to manage dependencies and structure your project in FastAPI . It includes detailed explanations of Poetry's core concepts and commands to help prevent issues that can arise during team collaboration and deployment. 1. What is Poetry? Poetry is a dependency management and packaging tool for Python. It goes beyond simply installing libraries by allowing you to clearly declare the dependencies your project needs and ensuring that all developers on the project have the same library versions. Clarity in Dependency Management : Explicitly manage your project's basic information and required libraries through the pyproject.toml file. Reproducible Builds : By locking all dependency versions in the poetry.lock file, it fundamentally prevents "it works on my machine" problems. Integrated Development Environment : It automatically creates and manages isolated virtual environments for each project and handles mo...

How to Resolve ACPI Errors When Installing Ubuntu 22.04 on ASUS GA502GU-PB73

Image
Introduction: While attempting to install Ubuntu 22.04 on ASUS GA502GU-PB73, the installation process halts with ACPI BIOS errors, specifically "ACPI BIOS Error (bug): Could not resolve symbol". This indicates a potential incompatibility with certain hardware components or incorrect BIOS/UEFI settings. ASUS does not officially support Linux distributions like Ubuntu, so the exact cause of issues cannot be clearly identified. However, it's possible that some hardware components in this laptop may not be fully compatible with certain Linux distributions or kernel versions. Additionally, problems related to ACPI (Advanced Configuration and Power Interface) can occur if the BIOS or UEFI settings are not configured correctly. [ 4.689445] amdgpu 0000:05:00.0: amdgpu: ring comp_1.3.0 uses VM inv eng 8 on hub 0 [ 4.689454] amdgpu 0000:05:00.0: amdgpu: ring comp_1.0.1 uses VM inv eng 9 on hub 0 [ 4.689463] amdgpu 0000:05:00.0: amdgpu: ring comp_1.1.1 uses VM inv eng 10 on hub...

Keeping Your Ubuntu 22.04 Laptop Powered On with the Lid Closed

If you're using a laptop with Ubuntu 22.04 and you want to keep it running even when the lid is closed, you'll need to modify a system configuration file. This is particularly useful if you're running long processes or using the laptop as a server. Here's a step-by-step guide on how to do it. Step 1: Modify the logind.conf File You'll need to edit the /etc/systemd/logind.conf file with superuser privileges. This file controls how the system responds to various events, including the lid being closed. Here's how to modify it: sudo vi /etc/systemd/logind.conf In the logind.conf file, find the line that says #HandleLidSwitch=suspend . Change it to HandleLidSwitch=ignore . This tells the system to ignore the lid being closed and keep running. [Login] #NAutoVTs=6 #ReserveVT=6 ... HandleLidSwitch=ignore ... Step 2: Apply the Changes After saving the file, you need to apply the changes. You can either reboot your laptop or restart the systemd-logind.service. To restart ...

Resolving Key Exchange Failure When Connecting with SecureCRT to OpenSSH

Image
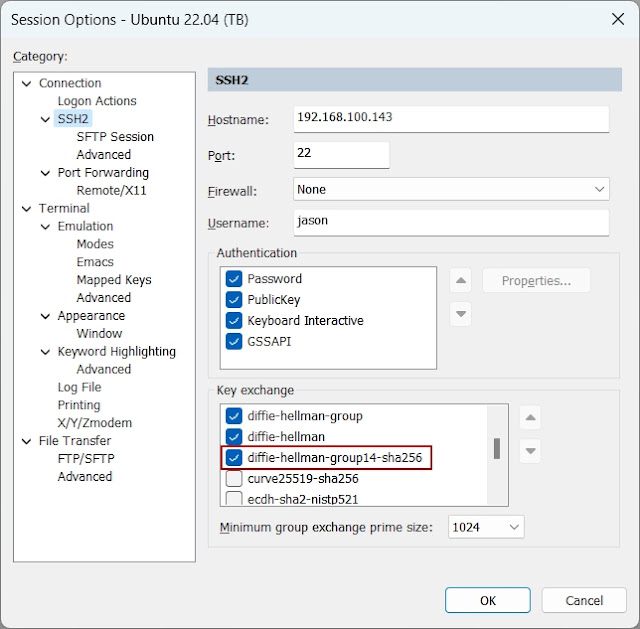
Recently, after installing OpenSSH on my Ubuntu 22.04 laptop, I encountered a challenge while trying to establish a connection using SecureCRT. An error message appeared: Key exchange failed. No compatible key-exchange method. The server supports these methods:   curve25519-sha256,curve25519-sha256@libssh.org,ecdh-sha2-nistp256,ecdh-sha2-nistp384,ecdh-sha2-nistp521,sntrup761x25519-sha512@openssh.com,diffie-hellman-group-exchange-sha256,diffie-hellman-group16-sha512,diffie-hellman-group18-sha512,diffie-hellman-group14-sha256,kex-strict-s-v00@openssh.com The following key-exchange method(s) are supported but not currently allowed  for this session:   curve25519-sha256,curve25519-sha256@libssh.org,ecdh-sha2-nistp256,ecdh-sha2-nistp384,ecdh-sha2-nistp521,sntrup761x25519-sha512@openssh.com,diffie-hellman-group-exchange-sha256,diffie-hellman-group16-sha512,diffie-hellman-group18-sha512,diffie-hellman-group14-sha256,kex-strict-s-v00@openssh.com,curve25519-sha256 Key-exchange m...

How to Paste Source Code Snippets in Google Blog (Blogspot)

When writing a technical blog post on Google Blogger, presenting source code snippets clearly and attractively can significantly enhance your content. Here's my step-by-step guide on how to insert source code into your Blogger posts effectively. Steps to Insert Source Code in Blogger: 1. Switch to HTML Mode: Start by switching to the HTML mode in your Blogger post editor. This mode allows you to edit the HTML content directly. 2. Paste the <div> Tag Templates: At the end of your post in HTML mode, paste the <div> tag templates provided below. Using a horizontal line or a separator between <div> tags can help in differentiating and organizing multiple code snippets. 3. Switch Back to Compose Mode: After inserting the <div> tags, switch back to the Compose mode. This mode is more intuitive for general writing and editing. 4. Copy and Paste Your Code into the Block: Select the block of code from your source (like a webpage, or an IDE such as VSCode or IntelliJ)...

Accessing Configuration Values in Spring Boot with @Value Annotation

Spring Boot simplifies the process of accessing external configuration properties, like those defined in application.properties or application.yml, making it easier to maintain and change these properties without altering the codebase. A common approach to access these values is by using the @Value annotation in Spring-managed beans. However, sometimes developers encounter issues when trying to inject these values directly into their classes. The Problem Consider you have the following setup in your Spring Boot application: application.yml app: default-avatar-url: /images/twitter-default-avatar.jpg AuthServiceImpl.java import org.springframework.beans.factory.annotation.Value; import org.springframework.stereotype.Service; @Service public class AuthServiceImpl implements AuthService { @Value("${app.default-avatar-url}") private String defaultAvatarUrl; } However, when you run the application, you encounter a startup failure with the following error me...